There’s nothing like a great vacation with friends or family: warm weather, hiking trails, or even a staycation to go try all the new restaurants and activities where you live. While a vacation means time away from work to recharge and relax, it’s also time away from managing your email inbox. It’s safe to say that everyone, to some extent, dreads that first day back to work where they’ll have to go through hundreds of new emails to find the important ones and catch up on what progressed over their time off. But what if it didn’t have to be this way?
How to Manage Emails Before & After a Vacation
With Outlook, there are many ways to prepare your inbox for a vacation and keep it nice and clean for when you return. With the proper use of settings such as automatic replies, rules, and organizational features, your inbox can be set up in a way that when you return from your trip your inbox will be organized and you can start tackling all your emails with ease.
Outlook Automatic Reply
Setting up automatic replies should be the first step you take to prepare for your vacation. With automatic replies, you can let people trying to reach you know that you’re currently out of the office and will be returning soon so they’re aware you likely won’t respond until you return. The automatic reply feature on Outlook is great, but there are some best practices you should follow to ensure communication can still be made while you’re away.
Example Automatic Reply Message
An automatic reply should be a statement that says something along the lines of:
“Hi,
Thank you for your message. I’m out of the office between (vacation start date) and (vacation end date), and I will not be checking my email while I’m gone.
If you need assistance on (topic or project related to your role), please contact (your team member designated to handle communications while you’re out).
Best,
(Your Name)
It’s important to keep this message simple and to the point, but also include important details such as the dates you’ll be away for, and who someone should contact in your place. This way, communication won’t stall at you, and it notifies other employees or someone trying to contact you when they can expect to get a response.
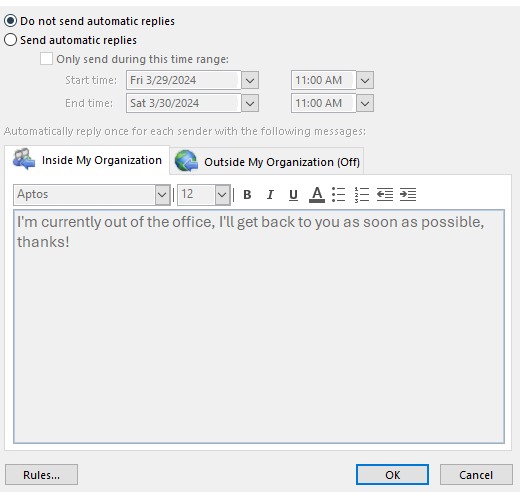
You can set up automatic replies in Outlook by clicking on File > Automatic Replies
The dialog box that pops up allows you to set the dates for the replies to be sent, what the message says, and whether you want to send this to only people in your organization or outside as well. There are also rules that can be set alongside automatic replies, which only trigger when you’re out of the office. This is also the next pre-vacation setup step.
Outlook Inbox Rules
Outlook allows you to create rules that make it easier for you to manage your inbox. Think of rules as a filter, you get emails from various sources, and rules allow you to put those emails into their own folders.
For example, let’s say I get an email from a reporting agency, and all the emails I get from that address are important to look at. I can set a rule that species all emails I receive from that address get put into their own folder that I can clearly see.
With rules, you’re able to filter emails you receive from specific addresses, words in the subject line, or even words in the body of the email. With rules you can send specific emails to their own folders or inbox, automatically forward emails to people, and even delete all emails from an address.
It’s important to set up rules for when you’re out of the office as it will ensure an organized inbox. If you regularly receive emails that need attention by the end of the week, you can have them automatically forwarded, or if you receive information that’s only relevant to that specific time, you can have that email deleted.
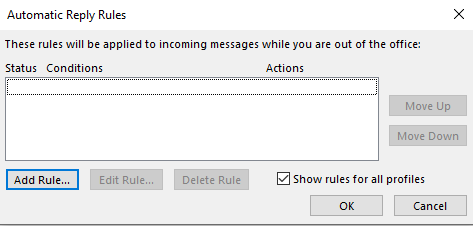
To set up Rules for when you're out of the office, in the Automatic Replies dialog box, click the button in the bottom left corner that says “Rules”.
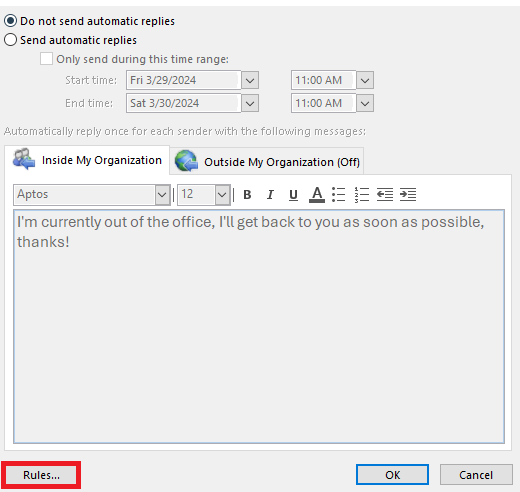
If you click that it will bring up another dialog box where you can create the rules you want to. If you click “New Rule”, a dialog box will pop up where you can specify the settings for the rule: the email address, subject, or body, you’re creating it for, the action that occurs for the specified emails, and whether you want to set a different automatic reply to these emails. Once you’re done with the settings, you can click “Ok” on all of the dialog boxes and you’re done setting up your new rule(s).
Please note, setting up rules within the Automatic Replies dialog box only applies those rules when you’re out of the office. Once again, if you want to set up rules for even when you’re in the office, you can do so by clicking File > Rules and Alerts.
Outlook Inbox Organization
Now that you’re all set up for when you’ll be out of the office, what are some ways you can more efficiently go through your emails when you return? Outlook has an assortment of organization options that make viewing your inbox easier and more efficient.
Outlook Sort Function
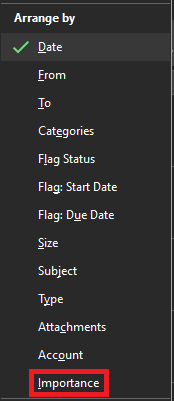
The Sort function allows you to sort your inbox by various criteria. For example, you can sort your inbox by importance, and emails that are flagged as important will be on the top, allowing you to focus on the high priority emails first. This is a great place to start when first returning from a vacation. To sort your inbox, click on the "By Date" button and then click on "Importance".
Outlook Filter Function
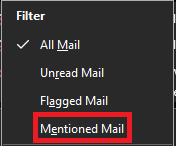
The filter function allows you to filter your inbox in 4 ways: All Mail, Unread Mail, Mentioned Mail, and Flagged Mail. If you’re just returning from a trip, filtering your inbox by Mentioned Mail or Flagged Mail is a great way to ensure you don’t miss any important communications. To filter your inbox by mentions, click on By Date > Mentioned Mail.
Outlook Search Function
The Search function in Outlook allows you to search for specific emails in your inbox by typing in a word or phrase that is either in the subject, body, or address. Searching is a great way to make sure you’ve seen all the communications related to a specific project or from a specific person while you were away. To search, simply click on the Search bar in Outlook and type in the phrase or address you want to look for. If you’re looking for a specific phrase or sender, be sure to include it in quotations to make sure the results only show the full phrase rather than every word.

Outlook Grouping
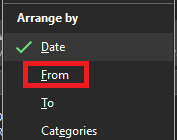
Grouping organizes your inbox by sender so you’re able to see all the emails received from an address grouped together rather than spread out. This allows you to quickly delete unwanted emails, or make sure to follow up on everything from a specific person. To Group, click on the By Date button and then click on From.
If you have any more questions on Outlook, or what you can do to make going through your inbox more efficient, contact us today.
Source: Microsoft

